Page History
| Info | ||
|---|---|---|
| ||
Note that the following instructions are for a Comodo PositiveSSL certificate / bundle. This process should be similar to other commercial SSL providers. |
In recent timesBy default, our recommendation for all network downstream sites a typical ACT remote site is to have them it submit a Certificate Signing Request (CSR) to the Hub for signing, in which a signed certificate is then sent back along with the Hub's CA and HTTPS certificate. Sites then import the certs into their shrine.keystore and configure certificate authority (CA) of the ACT tier to which they are joining. The CA will in turn generate a new certificate for the downstream site, and we will return that certificate, the hub certificate, and the CA certificate of the tier back to the downstream site. The site will then import the certificates into their shrine keystore file, and configure their shrine.conf and server.xml to look at that keystore to serve SHRINE. point to the alias entry in the keystore that corresponds to the site.
A typical keystore after importing all the certs in would look like this (assuming that the downstream site is called "shrine.example.edu"):
| Code Block | ||||
|---|---|---|---|---|
| ||||
Keystore type: jks Keystore provider: SUN Your keystore contains 3 entries acttestshrine.harvardshrineexample.netedu, Oct 31, 2018, PrivateKeyEntry, Certificate fingerprint (SHA1): 26:0B:FE:98:21:BA:C8:5A:A5:F5:35:79:8E:81:1A:E9:F4:3B:FF:56 shrine-act-test-ca, Jul 31, 2019, trustedCertEntry, Certificate fingerprint (SHA1): 13:4D:B5:5C:E3:48:A0:7B:9B:20:22:8B:0B:C1:BE:DD:B9:E4:1B:AD shrine-act-test.hms.harvard.edu, Jul 31, 2019, trustedCertEntry, Certificate fingerprint (SHA1): 52:82:A0:6D:D1:48:B2:EA:BB:2C:58:BD:E5:C7:3B:21:75:2B:46:F6 |
Their shrine.conf keystore would contain a block would look like this:
| Code Block | ||||
|---|---|---|---|---|
| ||||
keystore {
    file = "/opt/shrine/shrine.keystore"
    password = "xxxxxx"
    privateKeyAlias = "acttestshrine.harvardshrineexample.netedu"
    keyStoreType = "JKS"
    caCertAliases = ["shrine-act-test-ca"]
} |
And their server.xml 6443 Connector block would look would contain a block like this:
| Code Block | ||||
|---|---|---|---|---|
| ||||
<Connector port="6443" protocol="org.apache.coyote.http11.Http11NioProtocol"
               maxThreads="150" SSLEnabled="true" scheme="https" secure="true"
               clientAuth="false" sslProtocol="TLS"
               keystoreFile="/opt/shrine/shrine.keystore"
               keystorePass="xxxxxx"
keyAlias="acttestshrine.harvardshrineexample.netedu"/> |
The problem with this is that when you start Tomcat and then navigate to the SHRINE login page, you're greeted with a browser exception warning. This warning is because the CSR that the HUB CA signed is not a publicly recognized CA, therefore it's treated like a "self-signed" certificate. The end-user will then need to click through the warning to add an exception to the site. This can get taxing for larger institutions and will be tedious for each user.
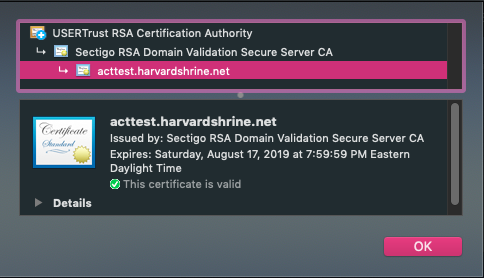
So, a solution for this is to utilize a commercial SSL cert to serve the SHRINE application through Tomcat. You will need to create a CSR from your existing shrine.keystore to send to the commercial provider to get a SSL cert back. For example, ComodoSSL will send back 4 certificates (after sending them the CSR):
- AddTrustExternalCARoot.crt
- SectigoRSADomainValidationSecureServerCA.crt
- USERTrustRSAAddTrustCA.crt
- acttest_harvardshrine_net.crt
One drawback when using the above approach is that a web browser attempting to access a shrine host configured in this way will generate a warning. The reason for the warning is that, by default, the browser does not trust the ACT CA, because none of the ACT CAs are public. Consequently, any certificate that the CA signs is not trusted by the browser. While the browser can be configured to ignore the warning and the CA can be manually imported into the browser's trust store, some downstream sites may opt for a more elegant approach. The option of using a third-party-signed certificate provides a more seamless user experience in the web browser, because the root and intermediate CAs are already trusted by the browser.
The following guide describes the process of using a third-party-signed certificate for the purpose of encrypting web browser traffic. It is important to note that a third-party certificate does not replace the ACT-signed certificate entirely, because the ACT-signed certificate is still required for signing all application-specific messages. Also, this wiki does not attempt to cover any vendor-specific processes or output files, because those can vary over time and across industry. It is up to each remote site that chooses this option to work with its vendor on any necessary technical details.
This guide also assumes the possibility that a site may initially opt for ACT-signed certificate, but later switch over to a third-party certificate. For all examples used in our illustration below, this guide uses a fictitious remote site called shrine.example.edu.
The first step for the remote site is to generate a certificate signing request (CSR) using a private key, and to send that CSR to an SSL/TLS vendor such as InCommon and Symantec. This step can be performed using either openssl or keytool. The vendor will in turn generate a certificate for the requested fully-qualified domain name (FQDN), and it may provide additional certificates for its root and intermediate CAs. The remote site should work with the vendor to concatenate all certificates together into one file, so that it would be possible to trace the chain of trust from the endpoint certificate all the way back to the root CA.
The next step is to ensure that the private key that was used to generate the CSR is in a separate file. If a utility such as openssl was used to generate the CSR, then a file containing the private key should already be present and this step is unnecessary. If, however, the site used keytool to generate the CSR, then the following commands should be run to extract the private key from the keystore into a separate file. Execute the following commands to extract the private key into a file called private_key.pem (the command below assumes that the keystore is called shrine.keystore):First, you'll need to bundle up the certs into a chained cert. It's important to add these certs in the correct order, which you can discern from getting the details from each cert. Each cert will refer to the next level cert. Typically, you'll be adding the domain cert + intermediate 2 + intermediate 1 + root.
| Code Block | ||||
|---|---|---|---|---|
| ||||
cat acttest_harvardshrine_net.crt SectigoRSADomainValidationSecureServerCA.crt USERTrustRSAAddTrustCA.crt AddTrustExternalCARoot.crt > chain.crt |
After you have created the chained cert, you will now need to extract the private key from the shrine.keystore that you had initially created:
| Code Block | ||||
|---|---|---|---|---|
| ||||
$ keytool -importkeystore -srckeystore shrine.keystore -srcstorepass <source_keystore_password> -srcalias shrine.example.edu -destalias shrine.example.edu -destkeystore shrine.keystore.p12 -deststoretype PKCS12 -deststorepass <destination_keystore_password> $ openssl pkcs12 -in shrine.keystore.p12 -nodes -nocerts -out private_key.pem |
Keep this private key safe in a secure directory!
| Info | ||
|---|---|---|
| ||
NOTE: If you had previously generated your own private key to acquire the commercial SSL cert, you can use that private key for the next steps, as the private key extracted from the shrine.keystore will not match the private key in the commercial SSL cert. |
This private key should be guarded carefully. Ideal places include an encrypted disk volume and non-persistent, RAM-based disk (such as /dev/shm in CentOS or Debian). The key can also be stored in an offline and physically secure location.
Next, upon receiving the signed certificate from the third-party CA, the remote site should then bundle the private key with the chained certificates into a PKCS12 file (.pfx or .p12 suffix) so that SHRINE can verify the chain of trust from the endpoint certificate all the way back to the root CA. Without this trust verification, SHRINE will be unable to use the certificates as intended. For our purpose, the PKCS#12 file format is ideal because it can combine a private key with all corresponding chained certificates into a single entry in the file, and because the format is accessible by both openssl and keytool. In the following command (again, assuming that the private key file is called private_key.pem), the certificates_file contains the new endpoint certificate plus all intermediate certificates plus the root certificate, and the ca_file contains only the intermediate certificates plus the root certificate. Run this command to bundle the private key, the endpoint certificate, and all intermediate and root certificates into one single entry within the PKCS12 storeNext, once you have the private key, you'll need to combine the chained cert and the private key into a PKCS12 package (.pfx) in order to import back into the shrine.keystore:
| Code Block | ||||
|---|---|---|---|---|
| ||||
$ openssl pkcs12 -export -in chain.crt<certificates_file> -inkey private_key.pem -out shrine.keystore.p12.temp -name shrine.example.edu-https -CAfile <ca_file> -chain.pfx -password pass:<your_pkcs12_file_password> |
Note here that the value of the -name field is "shrine.example.edu-https". The reason is that we will eventually be importing this entire entry back into the main Java keystore where another entry called shrine.example.edu already exists. Recalling our earlier discussion about the purposes of certificates, we note that shrine.example.edu entry is responsible for application message signing, while shrine.example.edu-https entry is responsible for web browser encryption. Therefore two distinct keystore entries are necessary.
The newly constructed PKCS12 file should now be imported into the original shrine.keystore. Execute the following command, and if prompted to overwrite existing entry, answer "yes":Once you have the PKCS12 package, you'll now need to import this into your existing shrine.keystore:
| Code Block | ||||
|---|---|---|---|---|
| ||||
$ keytool -importkeystore -deststorepass xxxxxxsrckeystore shrine.keystore.p12.temp -srcstoretype pkcs12 -srcstorepass <your_pkcs12_file_password> -srcalias shrine.example.edu-https -destkeystore shrine.keystore -srckeystoredeststoretype chain.pfxjks -srcstoretype PKCS12deststorepass <your_destination_keystore_password> -aliasdestalias acttestshrine.harvardshrineexample.netedu-https |
Once imported inthe import is completed, your shrine.keystore should now look like this:
| Code Block | ||||
|---|---|---|---|---|
| ||||
Keystore type: jks Keystore provider: SUN Your keystore contains 4 entries acttestshrine.harvardshrineexample.netedu, Oct 31, 2018, PrivateKeyEntry, Certificate fingerprint (SHA1): 26:0B:FE:98:21:BA:C8:5A:A5:F5:35:79:8E:81:1A:E9:F4:3B:FF:56 acttestshrine.harvardshrineexample.netedu-https, Jul 31, 2019, PrivateKeyEntry, Certificate fingerprint (SHA1): EF:AF:5E:D3:1A:97:AA:F2:6D:50:B8:9A:23:98:B5:2C:0C:18:C3:4B shrine-act-test-ca, Jul 31, 2019, trustedCertEntry, Certificate fingerprint (SHA1): 13:4D:B5:5C:E3:48:A0:7B:9B:20:22:8B:0B:C1:BE:DD:B9:E4:1B:AD shrine-act-test.hms.harvard.edu, Jul 31, 2019, trustedCertEntry, Certificate fingerprint (SHA1): 52:82:A0:6D:D1:48:B2:EA:BB:2C:58:BD:E5:C7:3B:21:75:2B:46:F6 |
Notice that there are now two (2) entries associated with shrine.example.edu: the original one continues to be used for application signing, and we will configure the "-https" entry for use by Tomcat to encrypt web browser traffic.
Next, configure Now, keeping everything the same in shrine.conf, you will need to switch the alias entry in Tomcat's server.xml to point to the newly imported, third-party-generated certificate package:
| Code Block | ||||
|---|---|---|---|---|
| ||||
<Connector port="6443" protocol="org.apache.coyote.http11.Http11NioProtocol"
               maxThreads="150" SSLEnabled="true" scheme="https" secure="true"
               clientAuth="false" sslProtocol="TLS"
               keystoreFile="/opt/shrine/shrine.keystore"
               keystorePass="xxxxxxxxxxxxxxxx"
keyAlias="acttestshrine.harvardshrineexample.netedu-https"/> |
Once that change is made, you will need to all configuration files have been updated, restart Tomcat services. Once things are back up. If everything has been configured properly, you should see a valid certificate ("lock") when you navigate to the SHRINE application: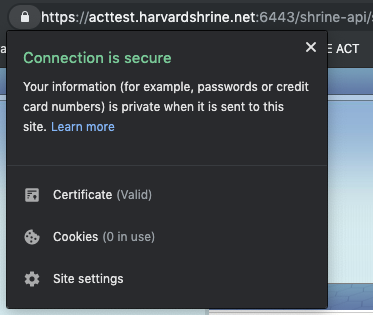
 no longer see any warning messages from your browser regarding untrusted certificates when accessing your SHRINE host.
Overview
Content Tools